
Making a Texture Impression
My line of texture stamps were designed specifically to go through most pasta machines (PM). This impression method gives you sharp consistent results and is quick and easy to do. However both pasta machines and texture stamp thicknesses can vary significantly, therefore the first thing we need to do is determine what your specific initial PM setting needs to be.
Before you use a brand new stamp for the first time, give it a wash with mild soap and water to remove any residue from the manufacturing process. Just a note to mention that the name of my textures are part of the rubber along one of the long edges in case the stamp gets separated from the packaging and you need to know which design it is.
Set your PM to its thickest setting. Slide your rubber stamp into the gap between the rollers. Does it fit through easily with room to spare? If yes, you can use the PM to make your impression. If the stamp does not drop easily through the gap, see below for manual impression instructions.
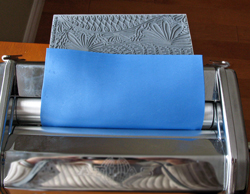
Next we need to determine what PM thickness setting to use for the clay sheet. Take some conditioned clay and put it through the PM at a medium-thin setting. I use Kato clay and find I do not need a release (water) on my rubber stamps because this clay is not sticky. If your clay does tend to be sticky, spray the stamp with water first. Next put the stamp face down on the sheet and put them through the PM together at your PM's widest setting. If your resulting clay sheet is very thin and the pattern is distorted, try again with a sheet created at a thinner setting. I use an Atlas 150 pasta machine and I generally create a sheet at my #4 setting (3-4 cards/1.3 mm thick,) and then put the clay sheet and the texture together at my #1 setting (8 cards/2.7mm). My resulting sheet is approximately 2-3 cards/1 mm thick. Experiment until you find the right setting that works for you. Make note of it for future reference.
Note using the PM may increase the size of the resulting pattern. This can be a good thing if you need a bit more pattern for your project! The rubber stamp can be put through the PM either vertically or horizontally.
Making a Manual Texture Impression
If your rubber stamp is not thin enough for your PM or you are using some other form of texture here’s my high-tech alternate method: Stack the texture sheet, clay and parchment paper and put the stack down on a hard surface floor, parchment side up. Step down on the pile repeatedly to create your impression. I like to do this in my sock feet rather than shoes where treads can miss areas. The foot has more flexibility to work the clay into the texture. Give it a try!
Before you use a brand new stamp for the first time, give it a wash with mild soap and water to remove any residue from the manufacturing process. Just a note to mention that the name of my textures are part of the rubber along one of the long edges in case the stamp gets separated from the packaging and you need to know which design it is.
Set your PM to its thickest setting. Slide your rubber stamp into the gap between the rollers. Does it fit through easily with room to spare? If yes, you can use the PM to make your impression. If the stamp does not drop easily through the gap, see below for manual impression instructions.
Next we need to determine what PM thickness setting to use for the clay sheet. Take some conditioned clay and put it through the PM at a medium-thin setting. I use Kato clay and find I do not need a release (water) on my rubber stamps because this clay is not sticky. If your clay does tend to be sticky, spray the stamp with water first. Next put the stamp face down on the sheet and put them through the PM together at your PM's widest setting. If your resulting clay sheet is very thin and the pattern is distorted, try again with a sheet created at a thinner setting. I use an Atlas 150 pasta machine and I generally create a sheet at my #4 setting (3-4 cards/1.3 mm thick,) and then put the clay sheet and the texture together at my #1 setting (8 cards/2.7mm). My resulting sheet is approximately 2-3 cards/1 mm thick. Experiment until you find the right setting that works for you. Make note of it for future reference.
Note using the PM may increase the size of the resulting pattern. This can be a good thing if you need a bit more pattern for your project! The rubber stamp can be put through the PM either vertically or horizontally.
Making a Manual Texture Impression
If your rubber stamp is not thin enough for your PM or you are using some other form of texture here’s my high-tech alternate method: Stack the texture sheet, clay and parchment paper and put the stack down on a hard surface floor, parchment side up. Step down on the pile repeatedly to create your impression. I like to do this in my sock feet rather than shoes where treads can miss areas. The foot has more flexibility to work the clay into the texture. Give it a try!
Create an Inverse of your texture stamp
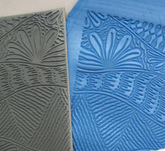
Create an inverse texture of a stamp for more pattern options. Using polymer clay, make an impression of a stamp using your PM as described above. Cure the impression. Use this polymer clay version as your texture sheet to get an inverse of the original stamp.
|
Be sure to use a resist such as water or Armor All so that your raw clay does not stick to the cured clay. Cornstarch or cornflour brushed on the clay is also an excellent resist.
|
Note you may freely incorporate Helen Breil Designs stamp impressions into your work, whether your art is for personal use or for sale.
If you would like information on creating your own textures from polymer clay I have written several tutorials covering this topic.
Pasta Machine Thickness Guide
There is now a standard way to refer to the thickness of sheets of clay. These guidelines were developed by Maggie Maggio & Sage Bray with the intention that all polymer clay tutorials, workshops, etc would use this standard when communicating a projects required clay thickness. Below you will see links to some background information on the development of this standard and a link to instructions on how to determine your pasta machine measurements. I encourage you to take a few minutes to do this simple exercise.


