
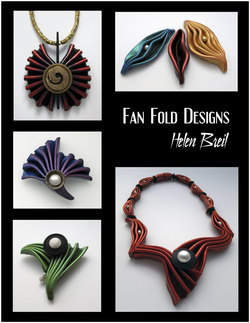
Fan Fold Designs
|
|
The following updates were made to the PDF file April 29, 2015
Page 6 Project Essentials / Clay
The recommended brands of clay are now: Soufflé, Fimo Professional, Fimo Soft and Premo.
Page 6 Project Essentials/Mica Powders
In addition to mica powders, Pan Pastels, soft chalk pastels, and crackled metallic leaf are additional options you can use.
Page 11 Project Essentials / Removing & Adding Mica Powders
Replaced the use of Armor All with Sage Bray's method of using a 1:1 ratio of rubbing alcohol & water.
Page 13 Project Essentials / Adhesives
I've added Golden brand "Polymer Varnish with UVLS" to the list of products you can use to seal your clay before applying Apoxie Sculpt. Other options are: Varathane, Cyanoacrylate glue or Armor All.
The following 3 pages were modified to remove references to using Armor All to remove mica powders.
Page 46 Round Symmetrical Design with Center Focal Point, step 5
Page 48 Asymmetrical Design , 3rd paragraph
Page 50 The Collapsed Fold Surface Technique, step 4, 2nd last paragraph
________________________________________________________________________________
If you are having trouble with your clay cracking on your folds, please see the following suggestions.
The following update was made Sept 8, 2014
Page 6 Project Essentials / Clay Added more recommended brands of clay
The clay for these projects needs to be very flexible in order to stretch in the folds without cracking. At the time of this writing (Sept 2014), I recommend the following brands: Soufflé, Premo and Fimo Soft.
---------------------------------------------------------------------------------------------------------------------------------------------
The following updates were made July 20th, 2014
Pages 15&16 Leaf Design 1
Changed the square cutter to be one size larger (9.5 cm) to allow for more folds and therefore a wider pendant.
---------------------------------------------------------------------------------------------------------------------------------------------
The following updates were made July 10, 2014
Page Section and Action New Text
|
6
13 14 14 15 16, 24, 37 44 |
Mica powders
New 2nd bullet text added New top paragraph on this pg - Adhesives section Attaching your Focal Point - 1st paragraph Added text Attaching your Focal Point - 2nd paragraph Added text Materials list - cutters for Leaf Shape Design 1 Step 3 - Make the Folds Added text: Round Symmetrical Design with Center Focal Point - Step 1 Step 1 text was missing. Added: |
Even though mica powders cover the surface of the clay, the hue (colour) & value (light/dark) of the clay you choose has a significant effect on the final look. Do a test: Pick a mica powder and try it on both white & black clay to see the difference. Keep this in mind when making your clay/mica powder combination decisions.
If you want to have full saturation of you chosen colour, choose a mica powder that matches your clay. Apoxie Sculpt® will not stick to bare, unsealed cured polymer clay. To ensure adhesion does not fail, cover the connection point on your clay piece with a layer of Varathane, Cyanoacrylate glue or Armor All. Let it dry. Now you can go ahead and attached your desired item to this sealed area of clay using Apoxie Sculpt. When possible, texturing your clay at the connection point is helpful as well. Other products may work as a surface that Apoxie Sculpt can adhere to. Be sure to test your alternate product first to ensure successful adhesion. Roughen up back of components to be attached to pendant. No roughing up of the clay piece itself is needed. Note it is important you have Varathane on your connection point in order for the adhesion be successful. Added link to sanding instructions for cutters on my website. To prevent the clay from cracking, keep the folds soft rather than a sharp crease as you'd do with paper. Roll out a clay sheet approximately 3-4 mm thick in your chosen colour. Cut a rectangle approximately 7.4 cm long x 8 mm wide. Cure the stick at the manufacturers recommended temperature. Drill the stringing hole approximately 1 cm down from the top. Start with your smallest drill bit and work your way up to the largest you need for whatever cording you plan to use. |


